
A while back, some colleagues and I got to talking about spice tolerance.  One thing led to another and  I somehow found myself committed to the P’Hall curry challenge at Bricklane Curry House.  The challenge had been on my mind since I first saw Adam Richman take down this bowl of inferno on Man v. Food (see below).  I even had plans with various NYC cohorts to take on the challenge, but we never seemed to be able to pull of the coordination.  Though to the detriment of my taste buds, my stomach, and my pride, this week, I finally made it with a group of coworkers (one of whom took the challenge with me).  Â
The deal is simple. Â Thirty minutes to take down a 16 ounce bowl of the stuff and you get a certificate, a beer, and your picture on the website.
To state the obvious, the curry is hot.  Not the hottest thing ever to pass my lips.  That honor goes to the bomb.  But, unlike other fiery concoctions I’ve encountered before, there was just too much.  I got through most of the chicken and maybe a quarter of the sauce.  The only flavor discernible above the heat was the bitter sweet flavor of one of the less finelly chopped chilies.  The heat wore on me as the water, rice and, bread I foolish used in my attempts to quell the burn filled my stomach until I couldn’t take another bite–I felt sick.
I may have lost the battle, but I don’t consider the war over. Â An observing coworker thinks she has what it takes and my fellow challenger is eager to declare victory. Â I’m reformulating my strategy away from rice and water and preparing mentally for a rematch in the next few weeks!
 Follow
If you take cooking seriously, you know that there are lots of tertiary skills which go along with cooking which really have nothing to do with applying heat and seasoning to food. This will be – hopefully – the start of a recurring series which examines some of those aspects of the culinary world. What can you expect from this series of posts? Things along the lines of choosing a knife, sharpening a knife, roasting and grinding spices, seasoning a cast iron pan, choosing the right pan, things along those lines.
In the inaugural post in this series, we are going to examine…. cutting boards!
Wait…don’t go! I see you closing your laptop! Look, I know cutting boards are not a sexy topic, certainly not as fun as looking at knives. But really, what the hell is the point of buying a $400 kitchen knife if you’re going to destroy it within a week by using a glass cutting board? As with anything, the fundamentals may not be exciting, but without them you’re really going to struggle down the line. So read on!
Choosing Your Board
There are TONS of choices when it comes to cutting boards. You can go with wood, bamboo, plastic, glass, stone, steel, or rubber. Well, technically you can go with any of those choices. In reality, you can pick between wood, bamboo or plastic/rubber. “But Loren”, you cry, “my marble cutting board looks so snazzy! And it’s really easy to clean, I can even throw it in the dishwasher!” POPPYCOCK, I retort! Fine, I guess you can keep using it if you want, but promise me you won’t ever spend more than $10 on a knife, because you will be throwing money away. A glass or marble or steel or stone cutting board is pretty much the worst possible thing you can do to your kitchen knives. Any time your cutting board is made of a material which is very hard, it will very rapidly dull your knife, and might even chip the blade if you’re not careful. These materials are just not meant to be used as cutting boards, despite how easily they clean.  If you already have one, you don’t have to get rid of it, just use it as a cheeseboard or serving platter or something.
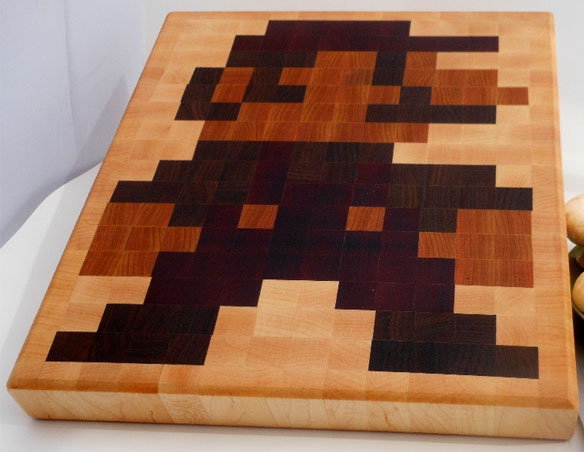
The best part about butcher blocks? They are ideal for recreating the 8 bit video game characters of your childhood.
Having settled that, let’s look at wood or bamboo cutting boards. First, the upsides: they look nice, and they are very easy on your knives. The downsides? Well, you can’t put them in the dishwasher, the bigger butcher blocks can be quite heavy, and they require a little maintenance on your part.
There is also a difference between thinner, flat grain boards and the big, thick butcher blocks which are end grain boards. While the ends grain boards are a little less convenient since they are more heavy and ungainly, they are much, much better for your knives. Basically, because the grains are running vertically, your knife essentially pushes the grain apart rather than crushing it or cutting it. When you take the knife away, the grains actually close back up so these boards are more resistant to showing cuts and nicks as well.
As for plastic boards: they are cheap, they clean up easily, they can go in the dishwasher, and they’re light. Some of them even have rubber feet or bottoms built in to prevent slipping on the counter. The problem? They just don’t lend the same kind of gravitas to your kitchen or your cooking. If you’re a serious cook, it makes sense to have a serious board, doesn’t it?
Really the best thing to do is have several. I have one wooden butcher block, one large bamboo board, and a few smaller plastic boards. This provides me with a little flexibility. If I’m pressed for time, I can use a board that can be put in the dish washer. If I’m prepping multiple components of a good meal, I can do all the veggies on a wood board and switch to plastic for the meat to prevent cross contamination.
 Caring for your Cutting Board
Assuming you haven’t already tossed aside my concerns about the relative lack of gravitas and decided to go exclusively with plastic boards, you are going to need to know how to clean maintain your wood or bamboo cutting board.The first rule of cleaning wood boards is: do not submerge them in water. The second rule of cleaning wood cutting boards is: DO NOT SUBMERGE THEM IN WATER. Being a piece of dried wood, your board’s natural reaction to being submerged in water for any length of time will be to absorb that water, which is going to cause you all kinds of problems, namely the wood will bulge, warp and crack. Once these things start happening, there is really no reversing them, you can only hope to keep the problem from getting worse. So, to clean your cutting board, just use a damp cloth and mild soap. This isn’t enough to seriously disinfect, but that’s OK because you already have a plastic board for cutting your meat, right? No? Jeez… alright. If you absolutely must use your wooden board for all tasks, including cutting meat, you can use a mild bleach or vinegar solution to disinfect the wood. Don’t make this a habit though.
Finally, you’ll need to oil your board every month or two to keep it up to shape. There are a good amount of products out there which are specifically designed for cutting board maintenance, some including protective waxes, but you really don’t need to go that route. Just a simple bottle of mineral oil will do the trick. Don’t try to use a vegetable oil of any kind, as they will turn rancid. Â Apply a
Mid-oiling
generous layer to one side of your board and wipe down with a paper towel or clean rag to make sure you have even coverage, then let the board sit for a few hours. Come back and get the other side, along with the vertical and horizontal faces and let sit for another few hours. If you have a big, thick board or block, you may need to repeat this process several times. Afterward, if there is still an oily film on the board, give it a quick wash.
Mise en place: the French phrase literally meaning “everything in place.”  If you’ve watched Top Chef, Chopped, Iron Chef, or any in the litany of cooking shows out there you’ve heard those words.  Its kitchen and chef talk for what you have when you’ve prepared and arranged all your ingredients for whatever it is you’re going to cook.
A bit back, at a work happy hour, I was talking with some co-workers about cooking and one mentioned that his wife has started “setting everything out before cooking like on the shows.” Â When I mentioned I do the same, I got some weird looks and a couple “whys.” Â I had to think for a second on the why.
I haven’t always done this, but over time just slowly started.  A few months back, I was able to pick-up, on the cheap, some nested bowls, ranging from a couple of teaspoons to huge, and really got into the preparation.  Over time, I just realized that the setup actually makes the cooking process quicker and easier.  But, most importantly, mise en place forces me to read the recipe through, think about what I’m going to do, and check a recipe for any gaps.
The last point can be critical for new recipes.  A few weeks, I tried a recipe from Pinetrest. A relatively simple pasta sauce recipe that looked simple to take on.  The problem? The recipe didn’t list retained pasta water in the ingredient list or mention until after I would have discarded it.  I was saved by the mise en place; by looking over the recipe and preparing I was ready for the curve ball thrown at me.
I may not need to worry about my mise en place when I’m making a dish I know and love well, but, when exploring the new or making the complex having everything, in its place is a winning strategy.
As almost any of my  local friends could tell you, I am hopelessly hooked on this recipe. I originally found it in a Splendid Table Summer Grilling handbook I got for joining Minnesota Public Radio (charitable brag), and I think I may have made it every single time I’ve grilled in the last 5 months. I’m not sure I’ve ever found another recipe which has such an insanely out of balance ratio of time, effort and money input for each unit of tastiness returned. This whole thing takes about 5 minutes to prep, it cooks on the same grill and at the same time as whatever else you might be grilling, and the end result is just fantastic. The only complaint I have with this recipe is that it may upstage whatever meat you’re grilling with it!

First prep the scallions by rinsing and drying all of them, then cutting off the roots at the bottom as well as the top 2 inches from the green end.  The asparagus  needs to be rinsed and trimmed as well. There’s a nifty trick for this, which ensures that you will always remove all the tough, fibrous part of the stem. Grasp the cut end of the asparagus in one hand, and then hold 2-3 inches up the stalk with your other. Bend the stalk until it snaps, and throw away the short end. There’s no consistent point that asparagus stems turn from tough to tender, and this method will allow each stalk to break naturally at that point.
Place all of the onions and asparagus on a platter or jellyroll pan, then drizzle on 2 tbsp or so of olive oil. The exact amount of each is not that important, but I usually do 2 bunches of scallions and 1 of asparagus. Also, if you’re able to find the smaller asparagus stalks, go for those. Asparagus, being much denser then scallions, takes significantly longer to cook. The small, thin ones seem to cook at roughly the same time, so those are ideal. Toss the veggies with the oil, and whatever seasoning you want. You could use just salt and pepper, or change it up for your tastes. I usually use Cavender’s Greek seasoning for this, it seems to work pretty well.
Don’t go nuts with seasoning the veggies, because after they grill you’re going to top with a balsamic vinaigrette. It doesn’t need to be perfectly executed, just mix balsamic, olive oil, Dijon mustard, garlic, and an herb or two. If you need a recipe to work off of, we’ve previously covered the America’s Test Kitchen vinaigrette recipe here, just make sure you don’t use the full amount. 1/2 cup or so of vinaigrette will be plenty.
Grill the veggies for 5 minutes or so, depending on how hot you have the coals. If they start to burn just move to a cooler part of the grill. When everything has a bit of color and has gone slightly limp, it should be ready. Toss the veggies with the balsamic mixture and serve immediately. You can top with some shaved Parmesan if you like, but its damn good as it is.
December has been a bad month for posts. Â Between work, boozy holiday festivities, and recovery from said festivities my free time at the keyboard has, yet again, been very limited. Â But lets make up for it with a little potty humor (and continued limited typing by me)!

Eggnog is one of my favorite things about the holiday season, next to unwrapping presents, sitting by a fireplace and busting through snowdrifts in my Jeep. If you like the storebought stuff, you will really love it when made from scratch. I will put one caveat to that however: if you don’t or can’t drink alcohol, just buy the carton from the store. Not that the home made nog won’t be good without the booze, but the difference in taste really won’t be enough to justify getting into this somewhat involved preparation. This recipe is an amalgam of Alton Brown’s and the one from Joy of Cooking, and makes about 6-7 cups. Scale up if you are serving a large party.
- 4 egg yolks
- 1/3 cup sugar, plus 1 tablespoon
- 1 pint whole milk
- 1 cup heavy cream
- 3 oz bourbon ( can also use brandy or dark rum, or all 3)
- 1 teaspoon freshly grated nutmeg (and a little more to garnish each cup)
- 4 egg whites
In the bowl of a stand mixer, beat the egg yolks until they lighten in color. Gradually add the 1/3 cup sugar and continue to beat until it is completely dissolved. Add the bourbon and cover, then let sit in the fridge for 1 hour. This step should mellow some of the raw eggy flavor. Add the milk, cream, bourbon and nutmeg and stir to combine. In a different bowl, beat the egg whites until soft peaks form. Hopefully you have a hand or stand mixer, or you’re going to work up quite a sweat with all of this egg beating. Add the remaining tablespoon of sugar and continue beating until stiff peaks form. Fold the egg whites into the other liquid, and serve. It’s important to make sure your ingredients are as chilled as possible when putting everything together, because if you have to put the final product back into the fridge to chill further, the liquid and the egg white foam will separate. You may want to try putting the ingredients and mixing bowls in the freezer for 10 or 15 minutes before starting the recipe.
In regards to the booze: There is a decent amount of variation in the amount of alcohol called for. Alton Brown’s recipe calls for 3 tablespoons, to make 6-7 cups. The Joy of Cooking recipe calls for 4-6 cups for a recipe about 3x as large. In this area, I follow the wise words of Mark Twain, when he wrote “too much of anything is bad, but too much Whiskey is just enough.” I would suggest making the recipe as outlined above, then giving it a try and adding more to taste. Myself, I would almost certainly double the amount of bourbon, but give it a try and see what you think.
Editors note: This post was, for some reason, written last August but never posted. Enjoy!

My 26th birthday came and went a few weeks ago while I was on a trip to visit Arthur in NYC. The trip was amazing, but the way it ended was pretty nice too. When I got home, there was a package waiting for me. I will confess, I still get that childhood sense of giddiness when a package arrives, let alone one that I didn’t order myself, let alone one arriving around my birthday! So after a stressful day of flying back from New York, I was delighted to find my birthday present from my brother. He got me a copy of Good Meat, an amazing book which I have previously mentioned on this site, and a super interesting comic book written by Anthony Bourdain, of all people. If you’ve never heard of it, it’s called Get Jiro and involves a super bad-ass sushi chef with a penchant for decapitation in a dystopian future where chefs are the real power in society.
Getting back to the topic at hand, this was the first recipe i decided to try from the new cookbook. My brother and his wife, to whom I gave this book as a christmas present two years ago, insist that there is not a bad recipe in the book, so I didn’t put too much thought into choosing the first recipe to make. I hadn’t made a good curry in a while, so I went with this one.
- 2 tablespoons virgin coconut oil or other cooking oil
- 1 large onion, thinly sliced
- 1 (13.5) oz can of coconut milk
- 1..5-2 tablespoons of prepared madras curry powder.
- 3 cloves garlic, minced
- 2 lbs stew beef, cut into cubes and patted dry
- Salt
- 1/2 cup water
- Chopped cilantro for garnish
Heat/melt your cooking oil in a dutch oven over medium high heat, and fry the onion to a golden brown, adjusting the heat as necessary to prevent the onions from burning. While the onion browns, open the can of coconut milk and spoon out the heavier “cream” to a separate bowl, setting aside the thinner liquid to use later. Stir the curry powder into the coconut cream to form a paste. Stir the curry paste, along with the garlic, in with the onions until the fragrance is driving your roommates insane with mouthwatering curry goodness, about 2-3 minutes. Add the beef to the pot and stir to coat with the curry mixture.
Mix the reserved coconut milk (the lighter stuff you left in the can and set aside), and the 1/2 cup water into the pan and bring it all to a boil, before immediately lowering the heat and simmering on the lowest possible setting. Cover and cook for 2 hours, stirring occasionally to prevent sticking. The curry is done when the meat is fork tender. Serve with basmati or brown rice, or whatever other starch you like. Rice noodles would be a good choice, I went with boiled yukon gold potatoes because as a Minnesotan boy, I have a weakness for meat and gravy over potatoes.
I departed from this recipe in two ways while I was making it. First, if you notice, this recipe calls for putting the raw meat into the stewing liquid with no searing beforehand. I wasn’t quite sure what to make of this, it always seems to me that developing that browning on the meat and in the pan is a key part of creating the flavor base of a stew or saucy dish, as long as the meat pieces are large enough to not make this step result in tough, overcooked meat. So what I ended up doing was seasoning the meat with kosher salt and fresh cracked black pepper, then searing it off in the dutch oven before proceeding to the onions. The one problem this presented was that by the time the onions were almost done cooking, I was starting to see the brown bits on the bottom of the pan start to make their way closer to black. Scorching the pan or the food in an additive, one pan dish like this will quickly ruin the whole dish and there’s really no way to recover. Next time, I think I will try to do it the way the recipe recommends. If there is not an appreciable difference, I’ll skip the searing and trust that the robust curry flavor of the sauce doesn’t need that extra hint of roasted meat.
Lastly, when the meat was done cooking, the sauce was still a bit runny for my preference. The taste was fantastic, but the texture wasn’t’ quite right for a stew or gravy. What I ended up doing was making a cornstarch and milk slurry and then whisking that into the pot and cooking for another 5-10 minutes with the cover off. That thickened up the sauce to just the right consistency. I definitely wouldn’t say that should be a standard step, just be ware that if you like a thicker sauce you might want to consider this option, or play with cooking without the lid to evaporate some more of the liquid.
 Last year, Loren posted about gifting Good Meat to his brother.  After receiving the book, Loren’s brother sat down to give it Saturday read with a few cups of tea.  I had the much the same experience when I got my hands on Truly Mexican.
The author Roberto Santibanez is the head chef of Fonda (the restaurant that redefined Mexican food for me).  Before I’d eaten at Fonda, I heard Santibanez on The Splendid Table and knew I had to learn more about real Mexican food.  My meals at Fonda have blown me away and I could only resist buying this book for so long.
The cookbook offers up page after page of instruction, recipes, and beautiful photos.  The reader is taken through the basics (how do you core a tomato, roast garlic, or pit an avocado) through easily executed salsas, guacamoles, and adobos to the advanced 22 ingredient multi-hour process that is the legendary mole poblano.
Another thing I love about this cookbook is the fact that Santibanez recognizes that owning the book doesn’t mean that you automatically live in Mexico or give you access to markets filled with the proper ingredients. To help bridge the gap between grocery store reality and Mexican cooking necessity, Truly Mexican lists a number of websites where more obscure chilies and other ingredients can be purchased and offers a few alternative chili peppers for some of the dishes.  I know it would be great to make my way to a proper store to purchase these items, but it’s nice to know I don’t have to to get what I need.
I haven’t gotten to cooking anything from here yet, but, once I’ve take care of Thanksgiving leftovers, Taco Tuesday better look out!  For now, I’m happy to page through this tasty tome before bed.

Not a bad place to go out, right?
I want you to know that I take this title seriously. This is not only the best stuffing I’ve ever had, it’s the best stuffing I can conceive of. I am willing to say right now that this is the perfect stuffing recipe, and if you say otherwise, I challenge you to a pistol duel at dawn on the tennis court attached to the Burj Al-Arab hotel in Dubai. What makes this stuffing so good is a perfect trifecta of white wine, cheese and wild rice. Doesn’t sound like that much of an epiphany, right? Trust me, it’s amazing. The melted cheese gives it a rich flavor, the white wine provides a bright acidic flavor to cut through everything, and the wild rice rounds out the taste as well as providing an interesting texture to a side dish that can sometimes be as texturally interesting as that jar of paste you used to grub on in kindergarten.
I probably should have posted this before Thanksgiving, but I really wanted to make it myself first. Prior to this year, I’ve only had this when my mother made it, and you just never know exactly how a recipe is going to work before you do it yourself. Plus, this way, you now have an excuse to make a turkey again for Christmas!
[DDET The ingredients list is rather long on this one]
- 3/4 cup wild rice – uncooked
- 2 cups water
- 2 chicken bullion cubes
- 3/4 tsp salt
- 3 tbsp butter
- 3/4 cup white wine
- 3 tbsp parsley
- 1 medium onion, chopped
- 1 cup chopped celery
- 1/2 cup mushrooms, sliced
- 3 cloves garlic, minced
- 1/2 tsp rosemary
- 1/2 tsp poultry seasoning (use more if bread cubes are not seasoned)
- 1/2 tsp sage
- 1/4 tsp savory ( I actually omitted this because I couldn’t find it in stores the night before turkey day)
- 1/8 tsp thyme
- 1 pound grated mild white cheese (monterey jack, muenster, mozz)
- 2 ounces grated parmesan cheese (about 1/2 cup)
- 10 oz stuffing (seasoned or not)
- Salt and pepper to taste
[/DDET]
Rinse the rice under cold water, then cook in the water, along with the bullion cubes, salt and 1tbsp of the butter. Cover and boil for 10 minutes before reducing the heat and simmering for 30 minutes. Remove from the heat and do not drain the liquid. I will admit that at this point I was slightly concerned with the aroma. I’d never cooked wild rice before, and just to warn you there is slightly… sulfurous odor that comes about. This is not cause for concern. That smell does not at all portend bad things for the flavor of the final dish.
Now sauté the onions, celery and mushrooms on medium heat with the remaining two tablespoons of butter. After two minutes, add the garlic and herbs. Cook for an additional two minutes, then remove from the heat.
In a large bowl (seriously, it needs to be pretty big you let you mix everything together), add the cheeses, dry stuffing, parsley and the sautéed veggies. Pour the wine into the sauté pan and scrape down the sides to get all the tasty bits, then pour that in the bowl as well, along with the rice and water. Mix well.
The recipe says this makes enough stuffing for a 20lb turkey. I myself subscribe to the Alton Brown school of turkey prep, which states that adding stuffing to your bird will destroy it. It takes so long for the stuffing to reach the appropriate temperature (165, same as the bird) that you will have to overcook the breasts in order to make the stuffing safe to eat. It just doesn’t make sense. Just go ahead and cook this stuffing in a casserole dish, or soufflé dish, or, hell, even a cake pan. I believe I baked it at 350 for about 10-15 minutes, then another 10 minutes or so later on to warm it up. The gooeyness of the melted cheese will make it pretty forgiving in terms of overcooking it.


ABOUT
Good Food, Good Drink, Great Living
RECENT POSTS
| M | T | W | T | F | S | S |
|---|---|---|---|---|---|---|
| 1 | 2 | 3 | 4 | |||
| 5 | 6 | 7 | 8 | 9 | 10 | 11 |
| 12 | 13 | 14 | 15 | 16 | 17 | 18 |
| 19 | 20 | 21 | 22 | 23 | 24 | 25 |
| 26 | 27 | 28 | 29 | 30 | 31 | |
Tags
Archives
- November 2014 (1)
- October 2014 (2)
- September 2014 (1)
- April 2014 (1)
- March 2014 (1)
- February 2014 (1)
- January 2014 (1)
- December 2013 (4)
- November 2013 (2)
- October 2013 (1)
- September 2013 (1)
- August 2013 (4)
- July 2013 (4)
- June 2013 (6)
- April 2013 (5)
- March 2013 (5)
- February 2013 (1)
- January 2013 (3)
- December 2012 (2)
- November 2012 (13)
- October 2012 (4)
- September 2012 (6)
- August 2012 (3)
- July 2012 (4)
- June 2012 (6)
- May 2012 (10)
- April 2012 (13)
- March 2012 (5)
- February 2012 (5)
- January 2012 (2)
- December 2011 (16)
- November 2011 (8)
- October 2011 (10)
- September 2011 (10)
- August 2011 (12)
- April 2011 (2)
- March 2011 (8)
- February 2011 (7)
- January 2011 (7)
- October 2010 (5)
- September 2010 (8)
- August 2010 (12)
- July 2010 (5)