Archive for November, 2012
Editors note: This post was, for some reason, written last August but never posted. Enjoy!

My 26th birthday came and went a few weeks ago while I was on a trip to visit Arthur in NYC. The trip was amazing, but the way it ended was pretty nice too. When I got home, there was a package waiting for me. I will confess, I still get that childhood sense of giddiness when a package arrives, let alone one that I didn’t order myself, let alone one arriving around my birthday! So after a stressful day of flying back from New York, I was delighted to find my birthday present from my brother. He got me a copy of Good Meat, an amazing book which I have previously mentioned on this site, and a super interesting comic book written by Anthony Bourdain, of all people. If you’ve never heard of it, it’s called Get Jiro and involves a super bad-ass sushi chef with a penchant for decapitation in a dystopian future where chefs are the real power in society.
Getting back to the topic at hand, this was the first recipe i decided to try from the new cookbook. My brother and his wife, to whom I gave this book as a christmas present two years ago, insist that there is not a bad recipe in the book, so I didn’t put too much thought into choosing the first recipe to make. I hadn’t made a good curry in a while, so I went with this one.
- 2 tablespoons virgin coconut oil or other cooking oil
- 1 large onion, thinly sliced
- 1 (13.5) oz can of coconut milk
- 1..5-2 tablespoons of prepared madras curry powder.
- 3 cloves garlic, minced
- 2 lbs stew beef, cut into cubes and patted dry
- Salt
- 1/2 cup water
- Chopped cilantro for garnish
Heat/melt your cooking oil in a dutch oven over medium high heat, and fry the onion to a golden brown, adjusting the heat as necessary to prevent the onions from burning. While the onion browns, open the can of coconut milk and spoon out the heavier “cream” to a separate bowl, setting aside the thinner liquid to use later. Stir the curry powder into the coconut cream to form a paste. Stir the curry paste, along with the garlic, in with the onions until the fragrance is driving your roommates insane with mouthwatering curry goodness, about 2-3 minutes. Add the beef to the pot and stir to coat with the curry mixture.
Mix the reserved coconut milk (the lighter stuff you left in the can and set aside), and the 1/2 cup water into the pan and bring it all to a boil, before immediately lowering the heat and simmering on the lowest possible setting. Cover and cook for 2 hours, stirring occasionally to prevent sticking. The curry is done when the meat is fork tender. Serve with basmati or brown rice, or whatever other starch you like. Rice noodles would be a good choice, I went with boiled yukon gold potatoes because as a Minnesotan boy, I have a weakness for meat and gravy over potatoes.
I departed from this recipe in two ways while I was making it. First, if you notice, this recipe calls for putting the raw meat into the stewing liquid with no searing beforehand. I wasn’t quite sure what to make of this, it always seems to me that developing that browning on the meat and in the pan is a key part of creating the flavor base of a stew or saucy dish, as long as the meat pieces are large enough to not make this step result in tough, overcooked meat. So what I ended up doing was seasoning the meat with kosher salt and fresh cracked black pepper, then searing it off in the dutch oven before proceeding to the onions. The one problem this presented was that by the time the onions were almost done cooking, I was starting to see the brown bits on the bottom of the pan start to make their way closer to black. Scorching the pan or the food in an additive, one pan dish like this will quickly ruin the whole dish and there’s really no way to recover. Next time, I think I will try to do it the way the recipe recommends. If there is not an appreciable difference, I’ll skip the searing and trust that the robust curry flavor of the sauce doesn’t need that extra hint of roasted meat.
Lastly, when the meat was done cooking, the sauce was still a bit runny for my preference. The taste was fantastic, but the texture wasn’t’ quite right for a stew or gravy. What I ended up doing was making a cornstarch and milk slurry and then whisking that into the pot and cooking for another 5-10 minutes with the cover off. That thickened up the sauce to just the right consistency. I definitely wouldn’t say that should be a standard step, just be ware that if you like a thicker sauce you might want to consider this option, or play with cooking without the lid to evaporate some more of the liquid.
 Last year, Loren posted about gifting Good Meat to his brother.  After receiving the book, Loren’s brother sat down to give it Saturday read with a few cups of tea.  I had the much the same experience when I got my hands on Truly Mexican.
The author Roberto Santibanez is the head chef of Fonda (the restaurant that redefined Mexican food for me).  Before I’d eaten at Fonda, I heard Santibanez on The Splendid Table and knew I had to learn more about real Mexican food.  My meals at Fonda have blown me away and I could only resist buying this book for so long.
The cookbook offers up page after page of instruction, recipes, and beautiful photos.  The reader is taken through the basics (how do you core a tomato, roast garlic, or pit an avocado) through easily executed salsas, guacamoles, and adobos to the advanced 22 ingredient multi-hour process that is the legendary mole poblano.
Another thing I love about this cookbook is the fact that Santibanez recognizes that owning the book doesn’t mean that you automatically live in Mexico or give you access to markets filled with the proper ingredients. To help bridge the gap between grocery store reality and Mexican cooking necessity, Truly Mexican lists a number of websites where more obscure chilies and other ingredients can be purchased and offers a few alternative chili peppers for some of the dishes.  I know it would be great to make my way to a proper store to purchase these items, but it’s nice to know I don’t have to to get what I need.
I haven’t gotten to cooking anything from here yet, but, once I’ve take care of Thanksgiving leftovers, Taco Tuesday better look out!  For now, I’m happy to page through this tasty tome before bed.
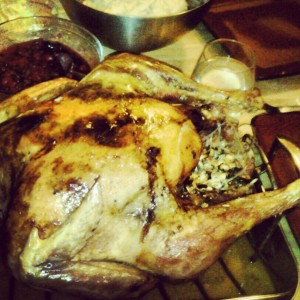
I want you to know that I take this title seriously. This is not only the best stuffing I’ve ever had, it’s the best stuffing I can conceive of. I am willing to say right now that this is the perfect stuffing recipe, and if you say otherwise, I challenge you to a pistol duel at dawn on the tennis court attached to the Burj Al-Arab hotel in Dubai. What makes this stuffing so good is a perfect trifecta of white wine, cheese and wild rice. Doesn’t sound like that much of an epiphany, right? Trust me, it’s amazing. The melted cheese gives it a rich flavor, the white wine provides a bright acidic flavor to cut through everything, and the wild rice rounds out the taste as well as providing an interesting texture to a side dish that can sometimes be as texturally interesting as that jar of paste you used to grub on in kindergarten.
I probably should have posted this before Thanksgiving, but I really wanted to make it myself first. Prior to this year, I’ve only had this when my mother made it, and you just never know exactly how a recipe is going to work before you do it yourself. Plus, this way, you now have an excuse to make a turkey again for Christmas!
[DDET The ingredients list is rather long on this one]
- 3/4 cup wild rice – uncooked
- 2 cups water
- 2 chicken bullion cubes
- 3/4 tsp salt
- 3 tbsp butter
- 3/4 cup white wine
- 3 tbsp parsley
- 1 medium onion, chopped
- 1 cup chopped celery
- 1/2 cup mushrooms, sliced
- 3 cloves garlic, minced
- 1/2 tsp rosemary
- 1/2 tsp poultry seasoning (use more if bread cubes are not seasoned)
- 1/2 tsp sage
- 1/4 tsp savory ( I actually omitted this because I couldn’t find it in stores the night before turkey day)
- 1/8 tsp thyme
- 1 pound grated mild white cheese (monterey jack, muenster, mozz)
- 2 ounces grated parmesan cheese (about 1/2 cup)
- 10 oz stuffing (seasoned or not)
- Salt and pepper to taste
[/DDET]
Rinse the rice under cold water, then cook in the water, along with the bullion cubes, salt and 1tbsp of the butter. Cover and boil for 10 minutes before reducing the heat and simmering for 30 minutes. Remove from the heat and do not drain the liquid. I will admit that at this point I was slightly concerned with the aroma. I’d never cooked wild rice before, and just to warn you there is slightly… sulfurous odor that comes about. This is not cause for concern. That smell does not at all portend bad things for the flavor of the final dish.
Now sauté the onions, celery and mushrooms on medium heat with the remaining two tablespoons of butter. After two minutes, add the garlic and herbs. Cook for an additional two minutes, then remove from the heat.
In a large bowl (seriously, it needs to be pretty big you let you mix everything together), add the cheeses, dry stuffing, parsley and the sautéed veggies. Pour the wine into the sauté pan and scrape down the sides to get all the tasty bits, then pour that in the bowl as well, along with the rice and water. Mix well.
The recipe says this makes enough stuffing for a 20lb turkey. I myself subscribe to the Alton Brown school of turkey prep, which states that adding stuffing to your bird will destroy it. It takes so long for the stuffing to reach the appropriate temperature (165, same as the bird) that you will have to overcook the breasts in order to make the stuffing safe to eat. It just doesn’t make sense. Just go ahead and cook this stuffing in a casserole dish, or soufflé dish, or, hell, even a cake pan. I believe I baked it at 350 for about 10-15 minutes, then another 10 minutes or so later on to warm it up. The gooeyness of the melted cheese will make it pretty forgiving in terms of overcooking it.
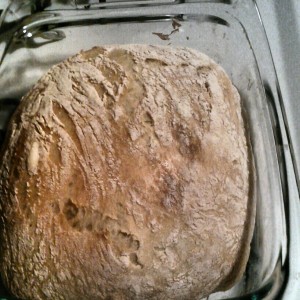 I made bread.  Let me type that I again.  I made bread!  And I am embarrassingly satisfied with myself for accomplishing  something that billions have managed to pull off ever since humans first gave-up hunting and gathering for this whole civilization experiment.
Baking bread, and baking in general, has always been a bit of a barrier to me.  Something outside my core competency.  I’ve seen people make bread, but the recipes just seemed doomed to failure in my hands.  But last week I was reminded of a supposedly simple can’t fail recipe.  I had the ingredients about and figured I’d give it a shot.
Ingredients:
- 3 cups all-purpose or bread flour, more for dusting
- 1 pack instant yeast
- 1¼ teaspoons salt
- 1 1/2 cups water (the original NY Times recipe called for 1 5/8 – I think that’s a really annoying measurement and 1 1/2 works just fine)
In a large bowl combine the flour, yeast, and salt. Â You can also add ingredients as desired (raisins, nuts, etc.). Â Add water, and stir until blended. Cover bowl with plastic wrap. Let dough rest at least 12 hours, Â but preferably about 18, at room temperature.The dough is ready when its surface is dotted with bubbles.
Lightly flour a work surface and place the dough on it. Sprinkle the dough with a little more flour and fold it over on itself twice. Cover loosely with plastic wrap and let rest about 15 minutes.
Using enough flour to keep the dough from sticking to work surface or to your fingers, gently and quickly shape into a ball. Put the dough down on a re-dusted work surface and dust with more flour, bran, cornmeal or whatever you’d like. Cover with a cotton towel and let rise for about 2 hours. When it is ready, dough will have more than doubled in size.
At least a half-hour before dough is ready, heat oven to 450 degrees. Put a 6- to 8-quart heavy covered pot (cast iron, enamel, Pyrex or ceramic) in oven as it heats. When dough is ready, carefully remove pot from oven. Slide the dough into pot. Â It might look like a mess, but that’s just fine. Cover with lid and bake 30 minutes, then remove lid and bake another 15 to 30 minutes, until loaf has browned.
The Results:
Bread! Â And a house that is filled with the smell of fresh baked bread. For almost zero active work!
After playing with the basic recipe I’m convinced you would have to intentionally try to make it fail.  At four in the morning, after a night of poker playing and more than my fair share of whiskey, I tried some “creativity.” I’m told I looked like Muppets’ Swedish Chef–arms and flour flying everywhere–and sounded much like the same.  In my enlightened state, I decided beer is better than water and substituted a cup of it in.  A few tablespoons of brown sugar seemed like a good idea, as did a small palm full of black finishing salt.  The next night I was almost afraid to bake the monstrosity.  But, though a little on the salty side and runny before baking, the bread turned out perfectly enjoyable!  (They say a four year old can make it and now I believe it!)
I’m very excited to experiment with additions and twists to this recipe and to have fresh bread around as the weather cools in these dark winter months.
 Everyone wants it.  Dreams of it.  Is disappointed when they don’t get it – when they take a bite out of the thanksgiving turkey and find it to be…. DRY!
This problem that faces our great nation every November can be avoided. Brine to keep your turkey moist.  I really don’t know why the airwaves aren’t full of PSAs informing the public of this process.
A simple brine is just salt water.  When you soak your meat in this salt water you get more tender and more moist meat.  And, as an added bonus, the brine can be used as a vector for flavor conveyance.  BUT YOU NEED TO START EARLY – one to three days before the big day.  So hurry!
Here is how you do it:
For every five pounds of turkey get half a gallon water and a half cup of kosher salt.
In a large pot bring the water to a simmer and dissolve the salt. Â Now you have a pot of brine. Â Let the brine return to room temperature (we don’t want to soak the bird in warm water). Â If your turkey fits in your pot, drop it in and put it in the fridge. Â If your turkey is too big, get a heavy duty trash bag, place in the turkey and pour in the brine. Â If using the trash bag, Â I recommend operating in the sink and double or triple layering on bags to be on the safe side. Â The bird should be fully submerged.
Whether in the pot or in the bag, put the turkey and brine in the fridge for one – three days.  Prior to baking, rinse the bird to remove any excess salt and cook how ever family tradition dictates.
A quick Google search will yield countless things you can add to the brine to impart additional flavor (citrus, apple cider, herbs, etc.).  The flavor imparted is usually relatively minor, but can give a bit of an extra dimension.  If the flavors makes you nervous, skip it.  But, unless you are deep frying, don’t skip the brine! The turkey will be moist at the dinner table and for the leftovers in the days to come.
 It’s been a few months, but I’ve finally gotten back to Sloppy Joes. In my earlier attempt, I had a little pantry oversight (I really thought I had tomato sauce in there!) that led to an under sauced meal.  After that tasty, but somewhat failed, attempt I resolved to revisit this messy childhood favorite.
[DDET Click to see the Sloppy Joe Recipe]
Ingredients:
1 pound extra-lean ground beef
1 onion, diced
4 cloves garlic, minced
1 jalapeno, minced
1 red pepper, diced
1 can small red beans or pinto beans, preferably low sodium drained and rinsed
1 1/2 cups no-salt-added tomato sauce
2 tablespoons tomato paste
1 tablespoon red wine vinegar
1 tablespoon molasses
1 tablespoon Worcestershire sauce
1 teaspoon mustard powder
3/4 teaspoon salt
8 burger buns (or bread)
Directions:
Brown the meat and the onion in a large skillet over medium-high heat for 5 minutes. Drain the pan. Add the garlic, jalapeno, and red pepper and cook 5 minutes more, stirring occasionally. Stir in the rest of the ingredients, reduce heat to low, and simmer for 5 minutes more.
——
[/DDET]
This week, the results were much better, though not without a missed step or two.  A proper amount of sauce was a huge improvement. You want the stuff to actually soak into the bun and drip, as well as tumble, out of the sides. However, I was a bit lax in my dicing and ended-up with slightly larger bits of onion and red pepper than I would have liked.  The beans were also a bit on the big side–I only had a can of the large kidney beans about.  As a result of the larger sizes of things, the mixture felt a bit more like chili than Sloppy Joes.  On the next iteration, I’ll spend a bit more time with the knife.  Though I’d like to improve on the sauce as well.
The sauce was present this time and, though good, could be stepped up.  There was mutual agreement at the table that the Sloppy Joe improved with a little dunk in some BBQ sauce.  So why not take the Sloppy Joe sauce a bit more down the road from a chili to a BBQ sauce?  I’m thinking maybe a bit more molasses might do the trick. And maybe, just maybe, a little more heat–though playing with some burn may need to wait until Take 4.
 A while back I tried my hand at an apple cobbler. Â Having some cranberries in the freezer I decided to give them a try this time around.
The prep was as insanely easy as before and the result was a tart, sweet, doughy goodness that was fantastic with a little ice cream. Â I think blueberries could work great as well, when they finally come back in season.
I think next up may be looking at some other cobbler batter recipes to start figuring out the differences how this whole baking thing works.
——–
Ingredients:
- 1 cup all-purpose flour
- 2 teaspoons baking powder
- 3/4 cup white sugar
- 3/4 cup milk
- 1/4 cup butter
- 2 cups cranberries (frozen or fresh)
Directions:
Preheat oven to 325 degrees.
Melt the butter in a 9 x 9 inch baking dish.  Mix together the flour, baking powder, sugar, and milk. Pour the batter in the baking dish over the butter. Sprinkle cranberries on top of the batter, do not stir. Bake for 1 hour or until golden brown.
On my way home from watching the glorious Vikings’ victory over the Lions, my mind was on the beef stew simmering away in the slow cooker on the counter at home.
My Saturday idleness meant that I didn’t experiment with baking bread as I had planned–so I picked-up a loaf from a neighborhood bakery on my walk from the train. Â There was just one thing missing: butter.
I had butter in the fridge, but I wanted something more. Â I wanted garlic butter.
.
.
Ingredients:
- 1/4 cup butter
- 4 garlic cloves
Directions:
If you have a mortar and pestle, give the fresh garlic a course dice and mash until you have paste.  (If you don’t have a mortar and pestle, dice finely and use the side of a knife to smash out a garlic paste.)  Combine the butter and garlic in a small bowl and microwave for 20 seconds until mostly liquefied  Stir/mash the warm butter garlic mixture.  Set in the freezer for 10 minutes if you want it to harden quickly or place in the fridge until ready to serve.
The Result:
Vampires beware!  Here there be garlic buttered bread that goes great with stew!
If you’re a line cook, a dishwasher, a porter? Chances are, you’re paid by the hour. Even if your employer wanted to pay you for sick days and vacations, chances are, he can’t. If you’re anything like I was during my 28 years in the business, you’re already living paycheck to paycheck. You’re already struggling to make rent. Any unplanned cash flow interruption is going to cause some serious problems…
So, let’s do what we can. Just cause a little DIY place has got its power back on, doesn’t mean the bleeding has stopped. While there is no doubt that there are still people with direct, immediate, emergency needs, it would be a great help if those who can afford to do it would eat in the most seriously afflicted areas as early and as often as they can, patronizing local businesses in areas that were clearly hit hardest.
Tip heavily. And maybe send a $20 back to the dishwasher.
That’s not charity. It’s just neighborly.
Anthony Bourdain’s full article/blog post can be found at Eatocracy.
While this should not take the place of more targeted relief, I may need to make a trip this weekend to some of my favorite spots in hard hit Red Hook.

